1. The Starting Point for Creating a Second “IKEA Greenhouse” with a Detolf
IKEA’s Detolf was originally a vertical glass display case with a simple structure: a wooden top and bottom panel, four glass sides, and metal columns.
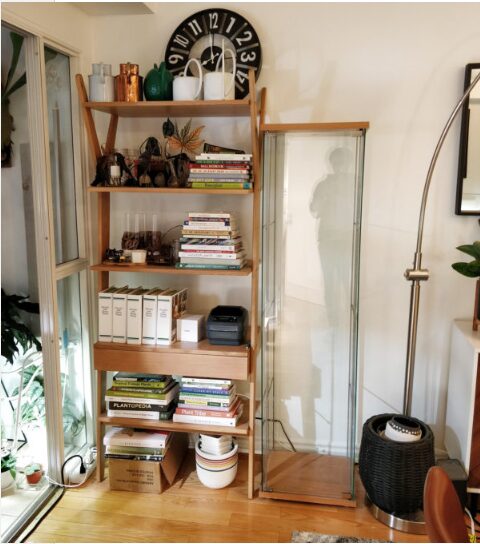
The author stumbled upon an old Detolf (with a wooden top and bottom panel) in the building’s recycling area. After cleaning it, they decided to transform it into a second indoor greenhouse after the Milsbo, to house more moisture-loving, light-loving foliage plants.
These types of display cases are common in the secondhand market, inexpensive or even free, making them ideal as the basic framework for “greenhouse expansion” without the need to purchase expensive dedicated planting boxes.
2. Basic Modification: From Cleaning to Wiring Preparation
1. Thorough Cleaning and Inspection
- Wire all glass surfaces with glass cleaner to remove dust and fingerprints.
- Clean and dry the wooden top and bottom panels, checking for warping or damage.
A structurally stable cabinet with intact glass is essential for subsequent appliance installation and humidity control modifications.
2. Pre-drilling Cable Management Holes
The Detolf top panel originally had a small hole for the original lighting cable, but it was too small.
- Use a 2-3/8 inch hole saw to enlarge the hole at a suitable location on the top panel, allowing the LED plant light power cable and USB fan cable to pass through simultaneously.
- Install white plastic cable grommets around the cut edges to conceal rough edges and prevent cable abrasion.
This way, all cables converge at the top of the cabinet, maintaining a clean and uncluttered appearance.
3. Installation of the Lighting and Ventilation System
1. Fixing the LED Plant Light Panel
The author chose an approximately 100W LED plant light panel as the main light source. – Secure the light panel to the back of the top panel using self-tapping screws, utilizing the mounting holes at the four corners.
- Place plastic washers between the screws and the top panel, leaving a gap between the light panel and the wood to facilitate heat dissipation.
- When drilling, mark the depth with tape on the drill bit to avoid accidentally drilling through the top panel surface.
After the light panel is fixed, the upper part of the cabinet will have a sufficiently strong and evenly distributed artificial light source, providing stable lighting for medium- to high-light plants.
2. Install a small fan to create airflow
- Select a mini USB fan and hang it below the light panel using the light panel mounting screws.
- Direct the airflow slightly downwards or to one side to create a gentle airflow within the greenhouse, preventing humidity from accumulating on the leaf surface.
Moderate airflow helps reduce mold and bacteria growth and also promotes a more even distribution of temperature and humidity.
4. Humidity Management: Using Sealing Instead of Humidifiers
1. Seal Gaps with Foam Strips
The Detolf cabinet was not originally a sealed unit; there were visible gaps between the door seams and the glass joints.
- Apply foam sealing strips of varying widths to the door frame and glass joints to seal as many visible gaps as possible.
- Allow for a small amount of natural permeation to avoid stuffiness and mold growth caused by complete lack of exchange.
Practice shows that with sufficient sealing, placing hydroponic containers or potted plants with moist substrate inside can significantly increase the humidity level inside the cabinet compared to the indoor environment, maintaining a stable range suitable for tropical plants, even without the use of a humidifier.
2. Monitor Temperature and Humidity
The author placed an electronic thermometer and hygrometer (such as a Govee) inside the cabinet to easily monitor environmental changes and adjust lighting duration or ventilation intensity.
5. Internal Structure: Climbing Frame Using Wooden Stakes and Horizontal Bars Instead of Glass Shelves
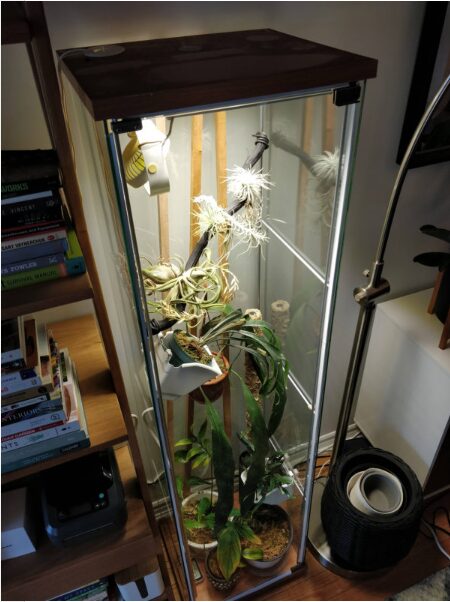
The original glass shelves are missing, but this actually makes it ideal for a plant greenhouse.
1. Wooden Stake Climbing System
- Use multiple wooden stakes of varying lengths, secured from the top with long screws, allowing them to be inserted diagonally downwards to form several “climbing paths.”
- As the plants grow, gently secure the stems to the stakes with binding wire or soft straps, allowing the plants to choose their own climbing direction.
Compared to flat shelves, this three-dimensional structure makes better use of the cabinet’s height and is suitable for planting climbing plants such as Araceae vines and Monstera deliciosa.
2. Suspending Small Potted Plants Using the Existing Metal Frame
The Detolf posts and top metal components can support a certain amount of hanging weight. Lightweight epiphytes, small potted ferns, etc., can be hung using S-hooks or binding wire, further enriching the three-dimensional layout.
6. Electricity and Safety: Neat “Hidden Wiring”
- All power adapters and timer power strips are neatly stored in a cable management box on the side bookshelf, with only the necessary wiring exposed.
- Use a timer-enabled power strip to control the plant lights and fan, enabling automatic switching at fixed times.
This reduces visual noise and avoids cluttered wire tangles around the cabinet, improving safety.
7. Plant Selection and Layered Arrangement
Based on light gradients, the author arranged plants with different light and humidity requirements at different heights:
- Top of the cabinet, near the light source: Several Tillandsia (air plants) are secured to decorative wooden branches with wire, enjoying strong light and good ventilation.
- Middle layer: Plants that prefer humidity and medium light, such as Platycerium willinckii ‘Mt. Lewis’ and Anthurium vittarifolium.
- Bottom Layer: Arrange climbing plants such as Epipremnum pinnatum ‘Skeleton Key’ and Monstera subpinnata, allowing them to grow upwards along the wooden stake.
This layout of “high-light upper layer, medium-light lower layer, and climbing lower layer” allows each plant to slowly unfold in its own suitable microenvironment.
8. From Old Cabinet to “Greenhouse”: A Replicable Approach
This Detolf renovation showcases a reusable logic:
- Find a structurally stable glass cabinet (IKEA, secondhand, or other brands are all acceptable).
- Solve three issues: light, ventilation, and humidity (prioritize sealing before considering humidification).
- Use vertical space instead of horizontal space, allowing climbing, epiphytic, and small tropical plants to each find their place within a limited volume.
Given the limited space in urban housing, this combination of “secondhand display cabinet + simple appliances + minimal materials” provides indoor plant enthusiasts with a low-cost solution to expand their growing space: it looks like a piece of furniture, but functions as a miniature tropical greenhouse.


")